A Money Trick… Literally, an Origami Folding Money Trick Un trucco soldi… letteralmente, un origami pieghevole denaro trucco
18 Aug 18 agosto
Posted by Travis Wright as Inviato da Travis Wright come Attitude Attitude , , Creativity Creatività , , General Generale , , Personal Finance Finanza personale , , Wealth & Money Il segmento Wealth & Denaro
Here is an unbelieveably cool tutorial on how to create a very cool gift for a waitress, valet, or bartender. Ecco un tutorial unbelieveably raffreddare su come creare un grande dono per raffreddare una cameriera, cameriere, barista o. This will get you noticed a bit, and a nice little ice breaker. Questo ti notato un po ', e un bel po' di ghiaccio magnetotermico.
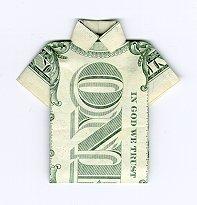
The Money Tshirt Design | Be a Hit with a Tip! Il Denaro Tshirt Design | Essere un colpo con un Suggerimento!
Try to start with a relatively clean, crisp bill. Provate a iniziare con un relativamente pulito, fresco di legge. It will make it much easier. Si renderà molto più facile. All folds should be sharply creased. Tutte le pieghe dovrebbe essere un bruscamente. It helps to go over the fold with a fingernail on a flat, hard surface. Esso aiuta ad andare oltre la piega con un unghie su un piatto, superficie dura.
Start by folding the bill precisely in half lengthwise. Inizia pieghevole il disegno di legge proprio a metà della lunghezza. (I prefer to fold in toward the front of the bill. I think it produces a nicer design on the end product. For your first attempt, it will be easier to follow exactly the same orientation on the bill as shown in the photos.) Unfold the bill, leaving the crease produced by the fold for the next step. (Io preferisco volte e verso la parte anteriore della fattura. Credo che produce un piacevole design sul prodotto finale. Per il primo tentativo, sarà più facile da seguire esattamente lo stesso orientamento sul disegno di legge, come mostrato nella foto). Spieghi il disegno di legge, lasciando l'incremento prodotto dal volte per il passo successivo.

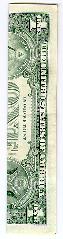
Fold the bill one quarter of the way in from each side lengthwise. Piegare il disegno di legge di un quarto del modo in lungo da ogni lato. The edge of the bill should just meet the crease made by the fold in the previous step. Il bordo del disegno di legge dovrebbe soddisfare le crementare appena fatta dal volte nel passaggio precedente. Do this for both sides as shown. Fate questo per entrambe le parti come mostrato in figura.
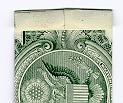
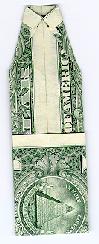
Turn the bill over. Accendere la fattura oltre. Fold the white of one end over as shown. Piegare il bianco di una fine, come indicato sopra. This will become the collar in the next step. Questo diventerà il collare nella fase successiva. (If the bill is printed unevenly, use the wider edge.) (Se la fattura è stampato in modo non uniforme, usa il più ampio margine.)
Turn the bill over again. Accendere la fattura di nuovo. From this side, angle-in the two corners from the end you folded in the last step. Da questo lato, l'angolo in due angoli dalla fine si e piegato l'ultimo passo. The two points should meet precisely at the centerline. I due punti dovrebbero riunirsi proprio a centerline. The angle is not terribly important, but should be about the same as shown in the photo. L'angolo non è terribilmente importante, ma dovrebbe essere di circa lo stesso, come mostrato nella foto.
Fold a little less than one third of the bill lengthwise from the opposite end as shown. Piegare un po 'meno di un terzo del disegno di legge da lungo l'estremità opposta come mostrato in figura. If you’re following in the same orientation as the photos, use the markings on the bill for a fold point. Se si sta seguendo lo stesso orientamento, come le foto, utilizza le marcature sul disegno di legge volte per un punto. (Notice that the edge of the bill just meets the word "OF" on the reverse printing.) If you fold too little, the shirt will appear too long in the end. (Si noti che il bordo del disegno di legge appena incontra la parola "DI" sul retro della stampa.) Se si piega troppo poco, la camicia apparirà troppo a lungo e alla fine. If you fold too much, the next step will not work. Se si piega troppo, il passaggio successivo non funzionerà. See below. Vedere qui di seguito.
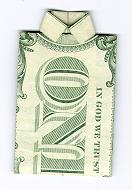
Now you will fold inward in the same direction, tucking the previous fold under the "collar" created in step 4. Ora si piega verso l'interno nella stessa direzione, tucking precedente volte sotto il "collare" creata nel passaggio 4. So far it looks kinda ‘nifty, and if you know it is supposed to look like a shirt, you get the collar concept. Finora sembra kinda 'brillante, e se sai che si suppone a guardare come una camicia, si ottiene il concetto di collare. But wait, there’s more… Ma aspetta, c'è di più…

Gently unfold the previous two folds, keeping the creases. Spiegare delicatamente i precedenti due pieghe, mantenendo le pieghe. On the lateral fold furthest from the collar, refold it strait across as shown. Sulla laterale volte più lontano dal collare, refold è stretto, come mostrato in tutta. (On the flatbed scanner, this made a bit of a mess of it, but it is fairly easy in 3D.) (Sulla scanner piano, questo fatto un po 'di caos di esso, ma è abbastanza facile in 3D.)
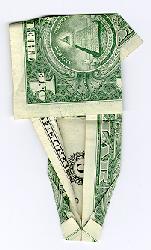
(This step is hard to describe, but it is actually fairly easy.) You are going to introduce two new folds on each "sleeve". (Questo passo è difficile da descrivere, ma in realtà è abbastanza semplice.) Stai per introdurre due nuove pieghe su ogni "manica". I do this by holding each side of the previous fold between thumb and forefinger in the Faccio questa azienda da ogni lato della precedente piega tra pollice e indice e il
orientation shown, just on either side of the vertical fold as shown. Orientamento dimostrato, solo su entrambi i lati della verticale volte come mostrato in figura. Just force the angle to close slightly, and force the extra paper inside the vertical folds. Just vigore l'angolo di chiudere leggermente, e forzare la carta extra all'interno delle pieghe verticali. Once you’ve got it looking right, force the insides to crease by pressing on a hard surface. Una volta che si guarda a destra, l'interno vigore a crescere premendo su una superficie dura. (Try looking at the next photo - like I said, it is hard to describe!) (Prova a guardare la foto successiva - come ho detto, è difficile da descrivere!)

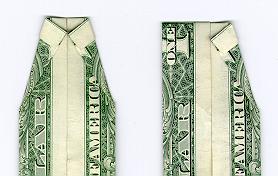
(This is a close-up of what the fold should look like when complete.) Do this for both sides. (Questo è un close-up di ciò che la piega quando dovrebbe essere simile completa.) Fate questo per entrambe le parti.
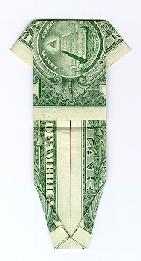
(This is what it should look like after both sides are complete.) (Questo è ciò che dovrebbe essere simile dopo che entrambe le parti sono completi.)
When you re-tuck the fold you’ve been working on back under the collar, you’re done! Quando si ri-ripiegare le volte che hai lavorato sul retro sotto il colletto, il gioco è fatto! It should look about like this. Dovrebbe apparire circa così. With the basic shape, the collar and the sleeves, it should be recognizable. Con la forma di base, il colletto e maniche, deve essere riconoscibile. Once you’ve done a few, you can try Una volta che hai fatto pochi, si può provare
folding the whole thing into the reverse side, leaving the obverse side out. Pieghevole in tutto il rovescio, lasciando il obverse side. (Like I said, I think this looks better. This is especially true with 1 dollar bills where the edge seal on the reverse under the collar looks a little bit like a necklace.) (Come ho già detto, credo che questo aspetto migliore. Questo è vero soprattutto con 1 dollaro fatture dove il bordo sigillo sul retro sotto il colletto guarda un po 'come una collana.)
What is really fun, is to fold up a 100 bill and put it in one of the plastic picture pouches in your wallet, to see how long you can keep $100 in your wallet! Quello che è veramente divertente, a volte è un disegno di legge 100 e mettetelo in uno dei sacchetti di plastica immagine nel vostro portafoglio, per vedere quanto tempo si può conservare $ 100 e il portafoglio! A test of retail fortitude! Una prova di forza di vendita al dettaglio!
EDIT: Here is a video for those who are money origami challenged. EDIT: Qui è un video per coloro che sono sfidati denaro origami.