A Money Trick… Literally, an Origami Folding Money Trick أ المال الخديعه… حرفيا ، اوريغامي المال خدعة للطي
18 Aug 18 أغسطس
Posted by Travis Wright as كتب بواسطة ترافيس كما رأيت Attitude الموقف , ، Creativity الابداع , ، General العام , ، Personal Finance التمويل الشخصي , ، Wealth & Money & ثروه المال
Here is an unbelieveably cool tutorial on how to create a very cool gift for a waitress, valet, or bartender. ها هو unbelieveably كوول تعليمي عن كيفية انشاء رائع جدا هدية لنادله ، خادم ، او النادل. This will get you noticed a bit, and a nice little ice breaker. هذا ما سيحصل لكم لاحظت وجود بعض الشيء ، وصغيرة لطيفة الجليد الموجة.
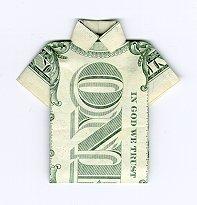
The Money Tshirt Design | Be a Hit with a Tip! الاموال التي شيرت تصميم | بلغ تكون مع نصيحه!
Try to start with a relatively clean, crisp bill. حاول ان تبدأ مع نظيفة نسبيا ، ومشروع قانون هش. It will make it much easier. انها ستجعل من الاسهل بكثير. All folds should be sharply creased. جميع طيات ينبغي حادا متجعد. It helps to go over the fold with a fingernail on a flat, hard surface. فهو يساعد على الذهاب أكثر من حظيره مع الاظفر على شقة ، يصعب على السطح.
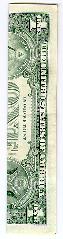
Start by folding the bill precisely in half lengthwise. أبدا للطي مشروع القانون على وجه التحديد في النصف طوليا. (I prefer to fold in toward the front of the bill. I think it produces a nicer design on the end product. For your first attempt, it will be easier to follow exactly the same orientation on the bill as shown in the photos.) Unfold the bill, leaving the crease produced by the fold for the next step. ط يفضلون في اتجاه اضعاف الجبهة من مشروع القانون. اعتقد انه ينتج ألطف تصميم على المنتج النهائي للمستهلك. المحاوله الاولى لجهودكم ، سيكون من الأسهل على اتباع نفس التوجه على مشروع القانون كما هو مبين في الصور.) تتكشف مشروع القانون ، وترك الطويه التي تنتجها حظيره للخطوة التالية.

Fold the bill one quarter of the way in from each side lengthwise. حظيره القانون ربع الطريق في كل من الجانب طوليا. The edge of the bill should just meet the crease made by the fold in the previous step. حافة مشروع القانون ينبغي ان مجرد تلبية الطويه الذي ادلى به مرات في الخطوة السابقة. Do this for both sides as shown. هل هذا لكلا الجانبين كما هو مبين.
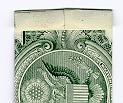
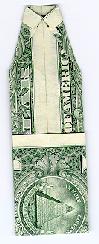
Turn the bill over. بدوره يزيد على مشروع القانون. Fold the white of one end over as shown. اضعاف الابيض من اكثر من واحدة كما هو مبين نهاية. This will become the collar in the next step. هذا وستصبح الياقه في الخطوة التالية. (If the bill is printed unevenly, use the wider edge.) (اذا كان مشروع القانون هو طبع بشكل غير متساو ، والاستخدام الاوسع الحافه.)
Turn the bill over again. بدوره مشروع القانون اكثر من مرة اخرى. From this side, angle-in the two corners from the end you folded in the last step. من هذا الجانب ، الزاويه في اثنين من اركان نهاية لكم مطويه في الخطوة الاخيرة. The two points should meet precisely at the centerline. فان نقطتين ينبغي ان تجتمع على وجه التحديد في محور. The angle is not terribly important, but should be about the same as shown in the photo. زاويه ليست مهمة رهيبه ، ولكن ينبغي ان يكون عن نفسه كما هو مبين في الصورة.
Fold a little less than one third of the bill lengthwise from the opposite end as shown. اضعاف اقل قليلا من ثلث مشروع القانون طوليا من نهاية العكس كما هو مبين. If you’re following in the same orientation as the photos, use the markings on the bill for a fold point. اذا كنت تريد ان تعرف ما يلي في نفس الاتجاه الصور ، واستخدام علامات على مشروع قانون لاضعاف نقطة. (Notice that the edge of the bill just meets the word "OF" on the reverse printing.) If you fold too little, the shirt will appear too long in the end. (لاحظ ان مشروع القانون حافة عادل تجتمع كلمة "من" على عكس الطباعه.) اذا كنت مرات قليلة جدا ، وقميصا طويلا وسيظهر في النهاية. If you fold too much, the next step will not work. اذا كنت اضعاف اكثر من اللازم ، فان الخطوة التالية لن ينجح. See below. انظر ادناه.
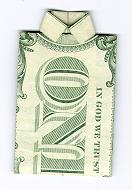
Now you will fold inward in the same direction, tucking the previous fold under the "collar" created in step 4. أنت الآن سوف اضعاف الوافد في نفس الاتجاه ، والدس السابق حظيره تحت "ياقه" التي انشئت في الخطوة 4. So far it looks kinda ‘nifty, and if you know it is supposed to look like a shirt, you get the collar concept. حتى الآن يبدو kinda 'nifty ، وإذا كنت تعرف ومن المفترض ان تبدو وكأن قميصا ، وانك حصلت على مفهوم الياقه. But wait, there’s more… ولكن مهلا ، يوجد المزيد…

Gently unfold the previous two folds, keeping the creases. بلطف تتكشف السابقتين الطيات ، وابقاء الطويات. On the lateral fold furthest from the collar, refold it strait across as shown. على الافقي اضعاف ابعد من الياقه ، انها اطو ثانية عبر المضيق كما هو مبين. (On the flatbed scanner, this made a bit of a mess of it, but it is fairly easy in 3D.) (على ماسح ضوئي مسطح ، وهذا يجعل شيئا من الفوضى منه ، ولكن ومن السهل الى حد ما في صورة ثلاثية الابعاد.)
(This step is hard to describe, but it is actually fairly easy.) You are going to introduce two new folds on each "sleeve". (هذه الخطوة الصعب وصف ، ولكن الواقع هو انه من السهل الى حد ما.) انت الذهاب الى ادخال جديدتين الطيات على كل "الكم". I do this by holding each side of the previous fold between thumb and forefinger in the أفعل ذلك من خلال عقد كل جانب من السابق اضعاف بين الابهام والسبابه في
orientation shown, just on either side of the vertical fold as shown. التوجه المبين ، عادل على اي من جانبي الخط العمودي اضعاف كما هو مبين. Just force the angle to close slightly, and force the extra paper inside the vertical folds. مجرد قوة لزاويه قريبة قليلا ، والقوة الزاءده ورقة داخل طيات الراسي. Once you’ve got it looking right, force the insides to crease by pressing on a hard surface. بمجرد النظر إلى أنها حصلت على حق ، لاجبار الدواخل الطويه بالضغط على سطح الشاق. (Try looking at the next photo - like I said, it is hard to describe!) (جرب وعند النظر الى الصورة التالية -- كما قلت ، ومن الصعب وصف!)
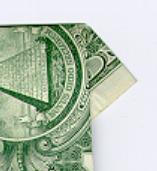
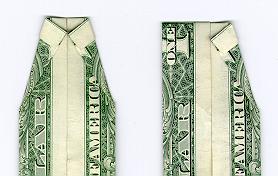
(This is a close-up of what the fold should look like when complete.) Do this for both sides. (هذا هو وثيقة متابعة ما حظيره ينبغي ان تبدو كمن عندما الكامل.) نفعل ذلك لكلا الجانبين.
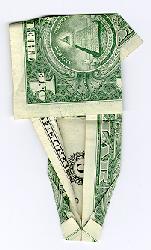
(This is what it should look like after both sides are complete.) (وهذا هو ما ينبغي ان تبدو كمن بعد الانتهاء من كلا الجانبين.)
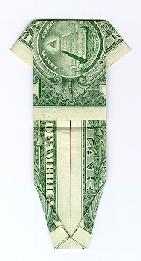
When you re-tuck the fold you’ve been working on back under the collar, you’re done! عندما كنت اعادة الثنية حظيره وانت تعملين على العودة تحت الياقه ، لقد انتهيت! It should look about like this. وينبغي ان ينظر عن مثل هذا. With the basic shape, the collar and the sleeves, it should be recognizable. مع الشكل الاساسي ، والياقه والاكمام ، وينبغي التعرف عليها. Once you’ve done a few, you can try بمجرد اتمامك قليلة ، ويمكنك ان تجرب
folding the whole thing into the reverse side, leaving the obverse side out. طي كل شيء الى الوجه الآخر ، وترك الوجه الجانب. (Like I said, I think this looks better. This is especially true with 1 dollar bills where the edge seal on the reverse under the collar looks a little bit like a necklace.) (كما قلت ، وأعتقد ان هذا تبدو افضل. وينطبق ذلك بصفة خاصة مع الدولار 1 الفواتير حيث حافة ختم على عكس تحت الياقه يتطلع قليلا مثل قلادة.)
What is really fun, is to fold up a 100 bill and put it in one of the plastic picture pouches in your wallet, to see how long you can keep $100 in your wallet! ما هو حقا متعة ، هو أضعاف ما يصل الى 100 الف مشروع قانون وضعه في واحدة من الحقائب البلاستيكيه الصورة في محفظتك ، لنرى كيف يمكنك ان تبقى طويلا 100 دولار في محفظتك! A test of retail fortitude! إختبار الثبات من التجزءه!
EDIT: Here is a video for those who are money origami challenged. تحرير : هنا هو فيديو لاولئك الذين هم المال اوريغامي طعن.