A Money Trick… Literally, an Origami Folding Money Trick Um truque dinheiro… literalmente, um origami Folding dinheiro truque
18 Aug 18 Agosto
Posted by Travis Wright as Postado por Travis Wright como Attitude Atitude , , Creativity Criatividade , , General Geral , , Personal Finance Finanças Pessoais , , Wealth & Money Riqueza & Dinheiro
Here is an unbelieveably cool tutorial on how to create a very cool gift for a waitress, valet, or bartender. Aqui está um frio unbelieveably tutorial de como criar um dom muito legal para um waitress, valet, ou bartender. This will get you noticed a bit, and a nice little ice breaker. Isto fará você notado um pouco, e um pouco agradável quebra-gelo.
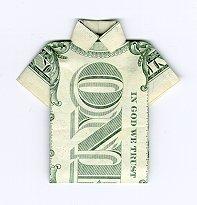
The Money Tshirt Design | Be a Hit with a Tip! O Money Tshirt Design | Seja um Hit com uma Dica!
Try to start with a relatively clean, crisp bill. Tente começar com um volume relativamente limpa, cristalino factura. It will make it much easier. Ele irá tornar muito mais fácil. All folds should be sharply creased. Todas as pregas devem ser drasticamente creased. It helps to go over the fold with a fingernail on a flat, hard surface. Ele ajuda a ir ao longo da dobra com uma unha sobre uma superfície plana e superfície dura.
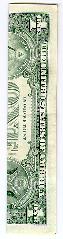
Start by folding the bill precisely in half lengthwise. Comece por dobrar o projecto de lei justamente na metade longitudinalmente. (I prefer to fold in toward the front of the bill. I think it produces a nicer design on the end product. For your first attempt, it will be easier to follow exactly the same orientation on the bill as shown in the photos.) Unfold the bill, leaving the crease produced by the fold for the next step. (Eu prefiro a dobrar em direção na parte da frente da factura. Penso que produz um design agradável sobre o produto final. Para a sua primeira tentativa, será mais fácil de seguir exatamente a mesma orientação sobre o projecto de lei como mostrado nas fotos.) Desdobrar o projecto de lei, deixando o tar produzido pela dobra para a próxima etapa.

Fold the bill one quarter of the way in from each side lengthwise. Dobre a factura de um quarto da forma como a partir de cada lado longitudinalmente. The edge of the bill should just meet the crease made by the fold in the previous step. A ponta da proposta de lei deve apenas cumprir o tar feita por dentro de tudo na etapa anterior. Do this for both sides as shown. Faça isso para ambos os lados, como mostrado.
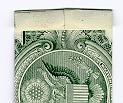
Turn the bill over. Vire a faturar mais. Fold the white of one end over as shown. Dobre o branco de um termo mais como mostrado. This will become the collar in the next step. Este será o colar na próxima etapa. (If the bill is printed unevenly, use the wider edge.) (Se o projecto de lei é impresso desigual, o uso mais amplo borda.)
Turn the bill over again. Vire a factura de novo. From this side, angle-in the two corners from the end you folded in the last step. A partir deste lado, ângulo-nos dois cantos dobrados a partir do fim-lo na última etapa. The two points should meet precisely at the centerline. Os dois pontos devem cumprir exactamente no central. The angle is not terribly important, but should be about the same as shown in the photo. O ângulo não é terrivelmente importante, mas deve ser sensivelmente o mesmo que o mostrado na foto.
Fold a little less than one third of the bill lengthwise from the opposite end as shown. Dobre um pouco menos de um terço do faturamento longitudinalmente a partir da extremidade oposta como mostrado. If you’re following in the same orientation as the photos, use the markings on the bill for a fold point. Se você for seguir a mesma orientação de como as fotos, utilizar as marcações sobre o projecto de lei para dobrar um ponto. (Notice that the edge of the bill just meets the word "OF" on the reverse printing.) If you fold too little, the shirt will appear too long in the end. (Note que a ponta da proposta de lei apenas cumpre a palavra "DE" no verso impressão.) Se você prega muito pouco, a camisa será exibido demasiado tempo no final. If you fold too much, the next step will not work. Se você prega muito, o próximo passo não irá funcionar. See below. Veja abaixo.
Now you will fold inward in the same direction, tucking the previous fold under the "collar" created in step 4. Agora você irá dobrar introspectivas na mesma direção, tucking o anterior dobra no âmbito do "colarinho" criado na etapa 4. So far it looks kinda ‘nifty, and if you know it is supposed to look like a shirt, you get the collar concept. Até agora ele parece estar kinda "bacana, e se você sabe que é suposto que se parecem com uma camiseta, você recebe o colar conceito. But wait, there’s more… Mas não é só isso…

Gently unfold the previous two folds, keeping the creases. Gentilmente desdobre as duas dobras anterior, mantendo a creases. On the lateral fold furthest from the collar, refold it strait across as shown. Sobre o lateral vezes mais afastado do colarinho, refold Estreito-lo em toda como mostrado. (On the flatbed scanner, this made a bit of a mess of it, but it is fairly easy in 3D.) (Na flatbed scanner, este fez um pouco de uma confusão da mesma, mas é relativamente fácil em 3D.)
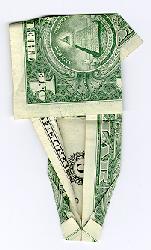
(This step is hard to describe, but it is actually fairly easy.) You are going to introduce two new folds on each "sleeve". (Esta etapa é difícil de descrever, mas na verdade é bastante fácil.) Você vai introduzir duas novas pregas em cada "manga". I do this by holding each side of the previous fold between thumb and forefinger in the Eu faço isso por exploração cada lado do anterior dobra entre o polegar eo indicador em
orientation shown, just on either side of the vertical fold as shown. orientação mostrado, apenas nos dois lados da dobra vertical como mostrado. Just force the angle to close slightly, and force the extra paper inside the vertical folds. Basta força para fechar o ângulo ligeiramente, e forçar o papel extra no interior das pregas verticais. Once you’ve got it looking right, force the insides to crease by pressing on a hard surface. Uma vez que você tenha que olhar direito, a força interior para tar pressionando sobre uma superfície dura. (Try looking at the next photo - like I said, it is hard to describe!) (Experimente a olhar para a próxima foto - como eu disse, é difícil descrever!)

(This is a close-up of what the fold should look like when complete.) Do this for both sides. (Este é um close-up do que prega o deve ser semelhante a quando completa.) Faça isso para os dois lados.
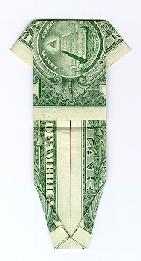
(This is what it should look like after both sides are complete.) (Isto é parecido com o que ela deveria após ambos os lados estão completos.)
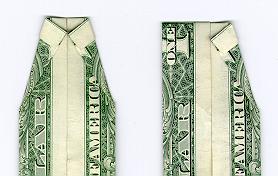
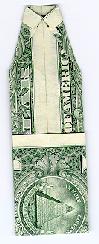
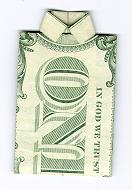
When you re-tuck the fold you’ve been working on back under the collar, you’re done! Quando você voltar a guardá da dobra você foi trabalhar na volta sob a gola, você está pronto! It should look about like this. Deve olhar sobre como este. With the basic shape, the collar and the sleeves, it should be recognizable. Com a configuração básica, a gola e as mangas, deve ser facilmente reconhecível. Once you’ve done a few, you can try Uma vez que você tenha feito alguns, você pode tentar
folding the whole thing into the reverse side, leaving the obverse side out. dobrar a coisa em todo o lado inverso, deixando a frente lateral para fora. (Like I said, I think this looks better. This is especially true with 1 dollar bills where the edge seal on the reverse under the collar looks a little bit like a necklace.) (Tal como eu disse, penso que esta aparência melhor. Isto é especialmente verdade com 1 dólar facturas onde a borda selo no verso sob o colar parece um pouco como um colar.)
What is really fun, is to fold up a 100 bill and put it in one of the plastic picture pouches in your wallet, to see how long you can keep $100 in your wallet! O que é realmente divertido, é a dobrar-se uma factura 100 e colocá-lo em uma das bolsas de plástico foto em sua carteira, para ver quanto tempo você pode manter a US $ 100 em sua carteira! A test of retail fortitude! Um teste de retalho fortaleza!
EDIT: Here is a video for those who are money origami challenged. EDIT: Aqui está um vídeo para aqueles que têm dinheiro origami contestados.